- What You’ll Achieve
- Prerequisites
- Example Use Cases
- FAQ
- Can I use this with any form builder?
- Do I need an approved WhatsApp template to trigger the flow?
- Is the phone number required in the form?
- Can I send flows to unsubscribed or new contacts?
- Why is my flow not triggering after form submission?
- Can I delay sending the WhatsApp flow after form submission?
- Where do I map the form fields to the WhatsApp flow?
- Can I personalize the flow with form data?
- Can I track these submissions?
Easily send WhatsApp multi-step flows (forms) directly from your website using Webhook Workflow in waatee. Whether it’s a form submission on your WordPress, Elementor, or any custom HTML site, you can instantly trigger WhatsApp messages — like lead qualification flows, confirmations, or onboarding forms — with no manual follow-up required.
This is perfect for real-time engagement, especially when you want to auto-respond to website visitors on WhatsApp.
What You’ll Achieve #
By the end of this guide, you’ll be able to:
- Send a WhatsApp Flow to a user’s phone number automatically when they submit a website form
- Connect any form tool (like WPForms, Elementor, Contact Form 7, or custom HTML) with waatee
- Auto-map the submitted form data to WhatsApp Flows Form using Webhook Workflow
- Track and personalize every submission with dynamic bot replies
Prerequisites #
- A verified WhatsApp number connected to waatee
- At least one WhatsApp Bot Flow already created
- A form on your website that collects the user’s WhatsApp phone number
- Access to edit your form’s settings or use a webhook
Configuration
Step 1: Creating whatsapp flow #
You need to create a whatsapp flow first. For creating WhatsApp Flows Form you can follow this article. Click here
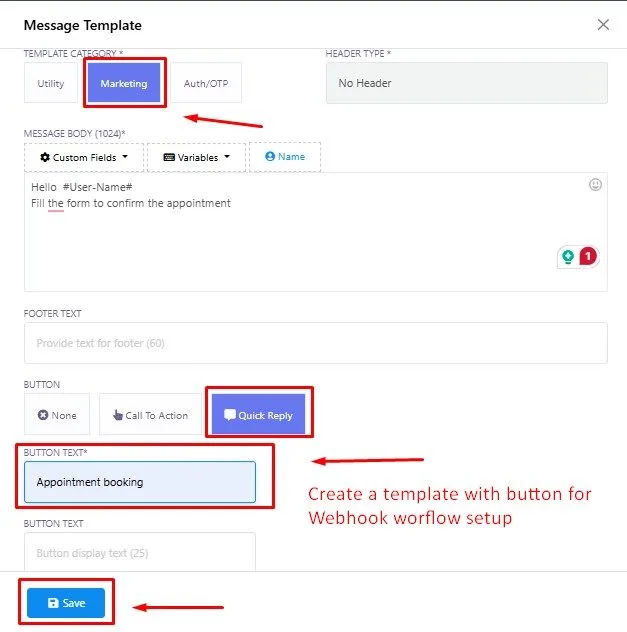
Step 2: Creating whatsapp template #
Create a whatsapp marketing template with cta/quick reply button. Learn more (how to create template link)
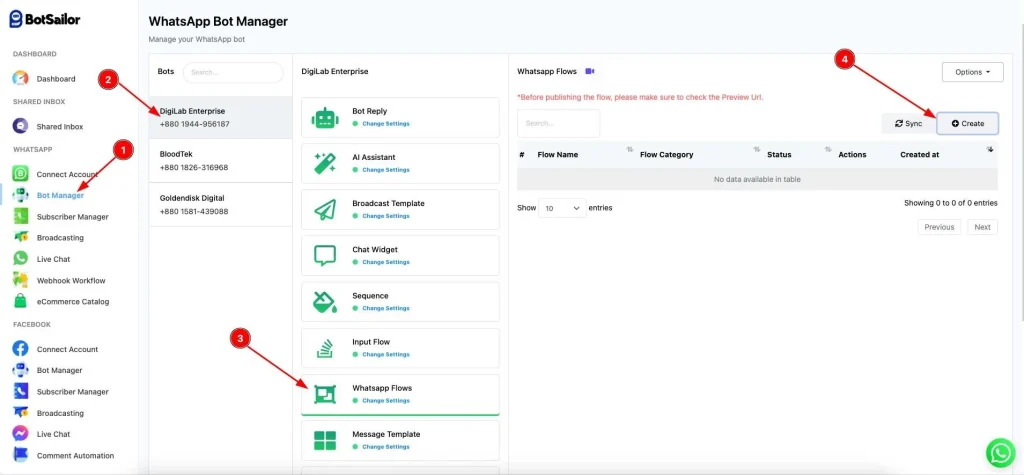
Step 3: Creating bot flow #
Now create a Bot flow using whatsapp flow form.
- Go to Bot manager > Create it will navigate to visual flow builder.
- Double tap on start bot flow and write a title.
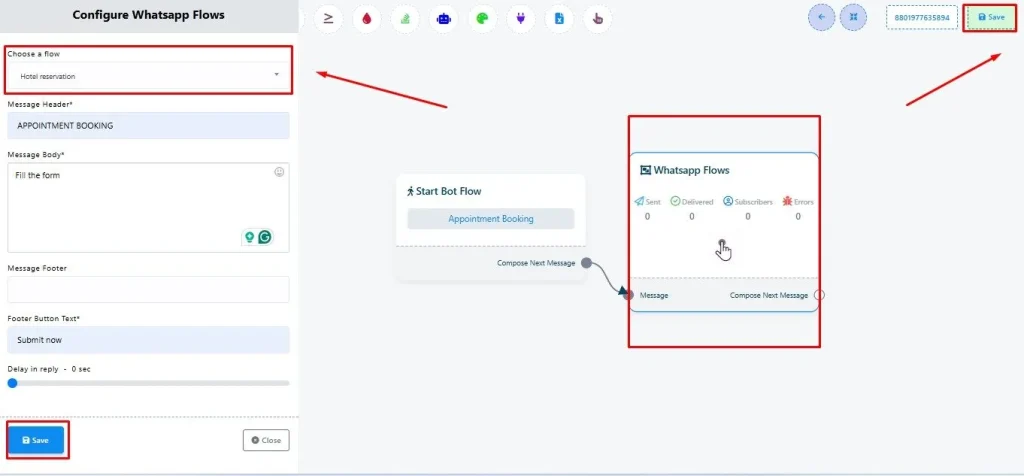
- Drag WhatsApp Flows Form from the element and double tap to configure it.
- Select the whatsapp flow we created at step 1.
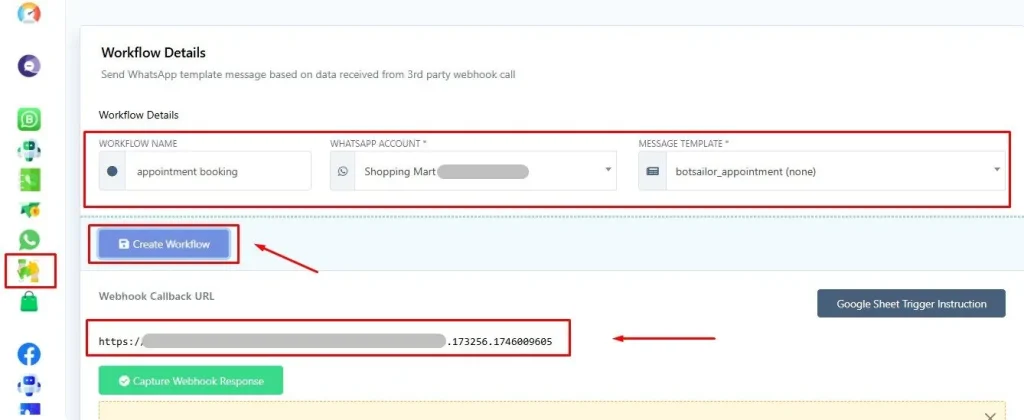
Step 4: Creating webhook workflow #
Create a Webhook workflow from the whatsapp sidebar.
- Navigate to whatsapp webhook workflow from the left bar and select
- Then input a workflow name > whatsapp account > whatsapp template (select the template which we created at the step 2)
- After that press create button and copy the webhook url
Step 5: Creating wp elementor form #
Create a elementor form at your website and add the copied webhook.
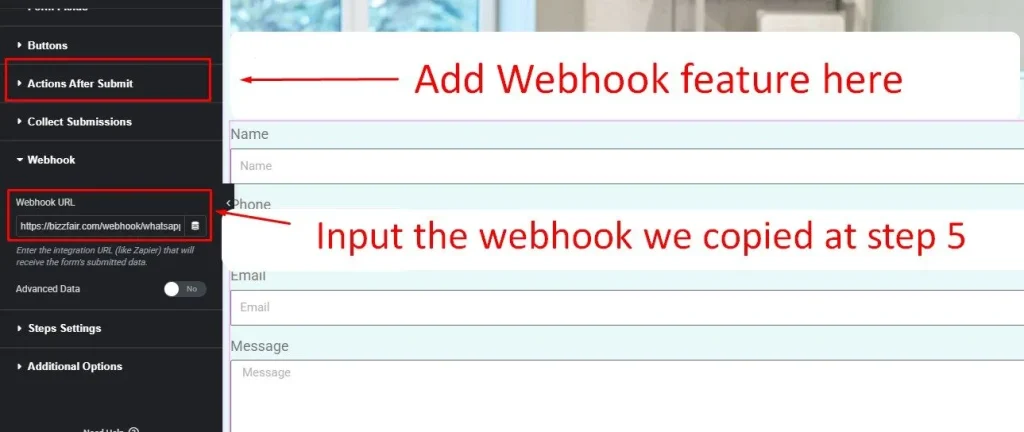
- Go to your website Dashboard > Elementor > Elementor form
- From action about submit add new action called webhook
- Then input the webhook url that we previously copied.
✅Make sure the variables (e.g; name, email, phone number, etc) you added to the whatsapp flow are available in your elementor forms.
If you face any difficulties, preview this article. Click here (Elementor how to blog)
Step 6: Capture and map webhook response #
Now you have to capture the webhook response and map that data.
- Go to whatsapp webhook workflow select the webhook we created at step 4
- Now input a sample data at your elementor form and capture webhook response.
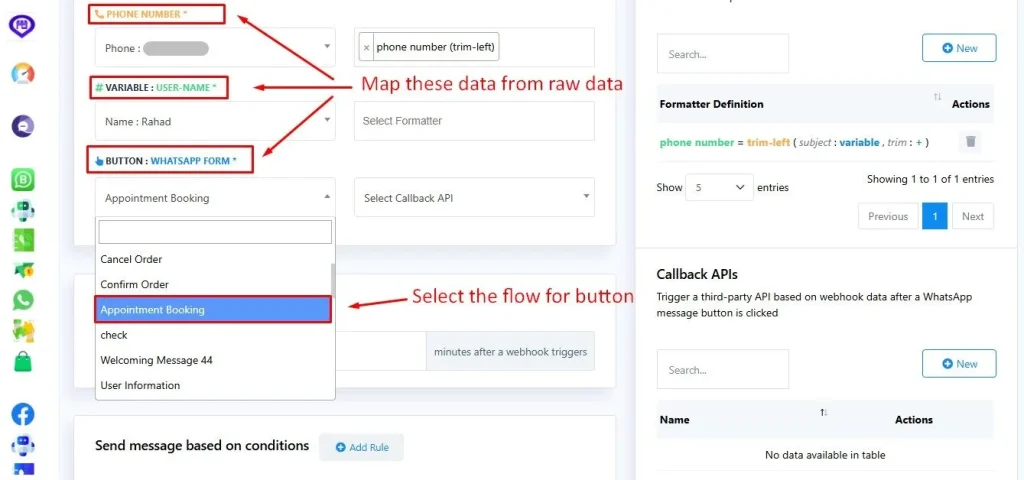
- Add the flow which we created at step 3 to the button section. (It’s mandatory)
- Select name, phone number etc variable from raw data for mapping
- Then save the flow
If all connections are set up correctly, the WhatsApp flow form will be delivered to your WhatsApp account immediately after submitting the website form. If you prefer to delay the flow delivery, you can configure a time delay within the bot flow settings, as explained in Step 3.
You can follow our troubleshooting guide if needed. Click here
Example Use Cases #
- Lead Generation: Send a qualification flow instantly after a landing page form is submitted
- Appointment Booking: Auto-send a booking confirmation or calendar integration flow
- Sales Inquiry: Start a dynamic WhatsApp chat when someone submits a contact form
- Order Confirmation: Trigger WhatsApp order verification right after form checkout
FAQ #
What is the purpose of using Webhook Workflow in waatee?
Webhook Workflow allows you to automatically trigger a WhatsApp flow (multi-step form) whenever a user submits a form on your website — such as Elementor, WPForms, Contact Form 7, or custom forms — without manual action.
Can I use this with any form builder? #
Yes. Any form builder that supports webhook or HTTP POST/GET (e.g., Elementor, WPForms, Gravity Forms, HTML forms) can be integrated with waatee’s Webhook Workflow.
Do I need an approved WhatsApp template to trigger the flow? #
Yes. You must create a WhatsApp marketing template that includes a CTA or Quick Reply button. This template will be used to initiate the conversation and trigger the flow.
Is the phone number required in the form? #
Yes. The form must collect the user’s WhatsApp phone number. It should be in international format (e.g., +8801XXXXXXXXX) for successful delivery.
Can I send flows to unsubscribed or new contacts? #
Yes, but only through an approved template. If the contact is outside the 24-hour window or not subscribed yet, only WhatsApp templates can be used to initiate the message.
Why is my flow not triggering after form submission? #
Possible reasons:
- Webhook URL not added correctly in form action
- Phone number not mapped or formatted properly
- WhatsApp bot flow not linked to the webhook workflow
- Missing CTA button in the selected template
See error log guide for solutions.
Can I delay sending the WhatsApp flow after form submission? #
Yes. Inside the Bot Flow, you can insert a Delay Element before the WhatsApp Flow component to wait a few seconds or minutes before sending.
Where do I map the form fields to the WhatsApp flow? #
Inside the Webhook Workflow panel in waatee:
- Submit sample data via your form
- Capture the raw data
- Match the data fields (name, phone, email, etc.) to waatee’s variables
- Attach the desired bot flow
Can I personalize the flow with form data? #
Absolutely! Use Custom Fields and dynamic variables (e.g., {{name}}, {{service}}) in your WhatsApp flow for personalized conversations.
Can I track these submissions? #
Yes. All submitted form data and conversation history are logged in:
- waatee Subscriber Manager
- Custom Field values
- Or optionally synced with Google Sheets


